
ROS2 Humble 설치
ubuntu 22.04에 ROS2 Humble을 설치하는 법을 정리해 보았다. 우분투 설치 방법은 아래 포스트를 참고하면 된다.
https://menggu1234.tistory.com/8
[Linux] 001 : Ubuntu 설치 18.04/20.04/22.04. Rufus & Ventoy 사용법
Ubuntu 18.04/20.04/22.04 듀얼부팅 또는 싱글부팅 설치 방법 + Rufus, Ventoy 사용법1. Ubuntu 소개우분투(Ubuntu)는 리눅스(Linux) 기반의 운영 체제로, 데비안(Debian)을 기반으로 만들어져 있다. 캐노니컬 사에서
menggu1234.tistory.com
ROS2 설치는 아래 ROS 공식 document를 토대로 작성되었다.
https://docs.ros.org/en/humble/Installation.html
Installation — ROS 2 Documentation: Humble documentation
You're reading the documentation for an older, but still supported, version of ROS 2. For information on the latest version, please have a look at Jazzy. Installation Options for installing ROS 2 Humble Hawksbill: Binary packages Binaries are only created
docs.ros.org
1. locale 설정 (UTF-8)
$ locale  # check for UTF-8

$ sudo apt update && sudo apt install locales
$ sudo locale-gen en_US en_US.UTF-8
$ sudo update-locale LC_ALL=en_US.UTF-8 LANG=en_US.UTF-8
$ export LANG=en_US.UTF-8

$ locale  # verify settings
2. apt 저장소 추가
ubuntu universe repository 활성화 확인
$ sudo apt install software-properties-common
$ sudo add-apt-repository universe
curl 등 설치 및 apt key 추가
$ sudo apt update && sudo apt install curl -y
$ sudo curl -sSL https://raw.githubusercontent.com/ros/rosdistro/master/ros.key -o /usr/share/keyrings/ros-archive-keyring.gpg
apt 저장소 추가
$ echo "deb [arch=$(dpkg --print-architecture) signed-by=/usr/share/keyrings/ros-archive-keyring.gpg] http://packages.ros.org/ros2/ubuntu $(. /etc/os-release && echo $UBUNTU_CODENAME) main" | sudo tee /etc/apt/sources.list.d/ros2.list > /dev/null
3. ROS2 패키지 설치
apt repository 업데이트
$ sudo apt update && apt upgrade
ROS2 Desktop 설치(추천)
$ sudo apt install ros-humble-desktop
ROS2 Base 설치(위에서 Desktop 버전 설치한 경우 설치 X)
$ sudo apt install ros-humble-ros-base
ROS2 개발 툴(컴파일러, 라이브러리 등) 설치
$ sudo apt install ros-dev-tools
4. 환경변수 설정
bash 파일 설정
$ sudo apt-get install gedit
$ gedit ~/.bashrcsource ~/colcon_ws/install/local_setup.bash
source /opt/ros/foxy/setup.bash.bashrc 파일 최하단에 위 내용 작성 후 저장.
5. alias 설정
$ gedit ~/.bashrcalias sb='source ~/.bashrc'
alias gb='gedit ~/.bashrc'
alias killgazebo='killall -9 gazebo & killall -9 gzserver & killall -9 gzclient'
alias cw='cd ~/colcon_ws'
alias cs='cd ~/colcon_ws/src'
alias ccd='colcon_cd'
alias cm='cd ~/colcon_ws && colcon build --symlink-install'
alias cb='source install/local_setup.bash'
alias cbs='colcon build --symlink-install'
alias cbp='colcon build --symlink-install --packages-select'
alias cbu='colcon build --symlink-install --packages-up-to'
alias ct='colcon test'
alias ctp='colcon test --packages-select'
alias ctr='colcon test-result'
alias rt='ros2 topic list'
alias re='ros2 topic echo'
alias rn='ros2 node list'.bashrc 파일 최하단에 위 내용 작성 후 저장.
6. colcon 워크스페이스 폴더 생성 및 빌드 테스트
colcon_ws/src 디렉토리 생성
$ mkdir -p ~/colcon_ws/src
빌드 테스트
$ cd ~/colcon_ws
$ colcon build
7. 예제 실행
talker 실행
$ ros2 run demo_nodes_cpp talker
listener 실행
$ ros2 run demo_nodes_cpp listener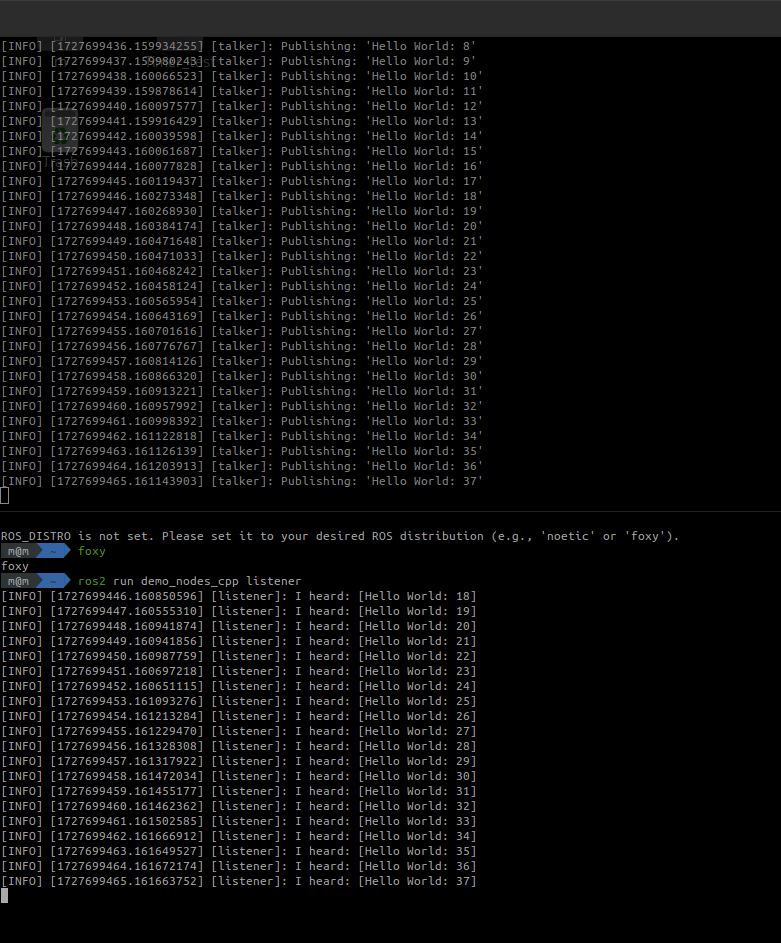
'ROS > ROS2' 카테고리의 다른 글
| [ROS2] 005 : ROS2 C++ 패키지, 노드 작성 가이드 (1) | 2024.10.29 |
|---|---|
| [ROS2] 004 : ROS2 노드(Node)와 데이터 (0) | 2024.10.29 |
| [ROS2] 002 : ROS2 예제 (demo_nodes, turtlesim) (0) | 2024.10.29 |
| [ROS2] 003 : ROS2 명령어 정리 (0) | 2024.10.29 |
| [ROS2] image_recognition 프로젝트 001 - usb_camera 패키지 (3) | 2024.10.10 |